How to Add Custom IR Codes to the TV Card
The Astrion TV Card supports user-defined infrared (IR) commands, allowing you to control devices that are not included in the built-in IR database.
We’ve noticed that some users successfully paste IR codes but do not see any response afterward. In most cases, this is caused by an incorrect IR code format. This guide explains the correct format and setup process.
1. Understanding the IR Code Format
The custom IR format supported by the TV Card is:
Frequency,Pulse1,Pulse2,Pulse3,Pulse4...
Example:
38000,8973,4497,560,556,560,556,560,556
Where:
| Value | Description |
|---|---|
| 38000 | IR carrier frequency in Hz (38kHz) |
| 8973 | First pulse duration (μs) |
| 4497 | First gap duration (μs) |
| 560 | Subsequent pulse/gap durations (μs) |
How It Works
The first number defines the carrier frequency used by the infrared transmitter.
For most consumer electronics such as:
-
TVs
-
Air conditioners
-
Set-top boxes
-
Audio equipment
the carrier frequency is typically:
38000 Hz (38kHz)
All numbers following the frequency represent alternating:
-
ON durations (carrier transmitted)
-
OFF durations (carrier stopped)
These durations are measured in microseconds (μs) and together describe the complete infrared waveform.
This format is widely used by Android-based IR transmission systems.

Example
If your IR analysis tool shows:
Frequency: 36000 Hz
Pulse sequence:
8961
4491
560
560
...
Then the Astrion custom code should be entered as:
36000,8961,4491,560,560,...
2. Requirements
Before using custom IR commands, you must install the Astrion Home Integration in Home Assistant.
Installation
Repository:
https://github.com/yyqclhy/Astrion-integration
Installation Method:
-
Open HACS
-
Add the repository as a Custom Repository
-
Select type: Integration
-
Install the integration
-
Restart Home Assistant
3. Configuring the TV Card
Step 1
Open your TV Card configuration.
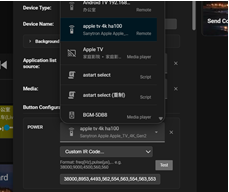
Step 2
Select the IR entity provided by the Astrion Home Integration.
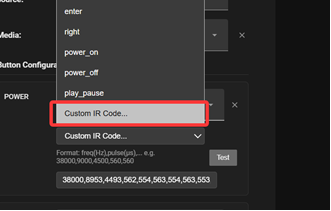
Step 3
Choose:
Custom IR Code
Step 4
Paste your IR code string using the format described above.
Example:
38000,8973,4497,560,556,560,556,560,556
Step 5
Save the configuration and synchronize the card with your Astrion Remote.
Troubleshooting
No Response After Pressing the Button
Please verify:
![]() The Astrion Home Integration is installed correctly.
The Astrion Home Integration is installed correctly.
![]() The selected IR entity is the correct one.
The selected IR entity is the correct one.
![]() The frequency value is included at the beginning of the code.
The frequency value is included at the beginning of the code.
![]() Values are separated by commas only.
Values are separated by commas only.
![]() No spaces or extra characters were added during paste.
No spaces or extra characters were added during paste.
![]() The target device supports IR control and is within range of the transmitter.
The target device supports IR control and is within range of the transmitter.
Still Not Working?
Please create a forum post and include:
-
Your custom IR code
-
The IR capture source/tool used
-
Screenshots of your TV Card configuration
-
Astrion firmware version
-
RosCard version
Our engineering team will be happy to help analyze the issue.
Thank you for helping us improve Astrion. Community feedback is extremely valuable and helps us expand compatibility with more devices and remote-control scenarios.